Our approach to LAPS + MDT
Background
Our team makes extensive use of Microsoft Deployment Toolkit (MDT) to build and rebuild Windows-based computers and virtual machines. We’ve been using MDT for many years, and have dozens of complex Task Sequences and templates for handling complicated deployment scenarios.
Recently, we wanted to have a better way for our MDT system to coexist with Microsoft’s Local Administrator Password Solution (LAPS). LAPS can be used in Active Directory environments to automate periodic resets of local administrative credentials, like the local Administrator (ie, “SID 500”) account. If you’d like to know more about LAPS and some of its intricacies, Alex Asplund’s article is excellent. LAPS settings are managed with Group Policy Objects (GPOs), and LAPS password resets are assessed for need and performed if required by the Group Policy Update process.
MDT with LAPS considered harmful
The primary issue with LAPS and MDT alongside one another is that during deployment, if LAPS is active, the password for the Administrator account may be reset by LAPS, then MDT will not be able to continue its Task Sequence; the machine expects to be able to log in as Administrator with the credentials that were previously set in the Task Sequence creation, but they’ve since been changed by LAPS. MDT puts its login information into the “Default” login areas (sometimes called autologon) of the registry at the start of deployment and will fail to login and continue if they’ve been changed after. Where the deployments fail may be inconsistent depending on how long the sequence runs, your LAPS settings, and your luck with Group Policy Update timing.
There’s several popular strategies for dealing with this:
- Place the computers you’re building in a “staging OU” with blocked inheritance, where the LAPS GPOs do not apply.
- In MDT’s Task Sequences, move the
Recover From Domaintask, where domain join occurs, to near the end of the sequence.
I don’t like these for several reasons:
- For staging OUs, it can be a bit of bear to re-link policies from above in hierarchy and keep that maintained over time, as new policies are created or linked. It can also be a bit of a chore to come back to the staging OU after deployment and move computer objects back to where they should permanently reside in your OU structure; this is especially true in a rebuild scenario where the computer is already where it should be. We also have several long-running deployments and it’s easy to forget to move the computer out of staging after its done building.
- Moving the
Recover From Domaintask is simple and effective, but if you have many Task Sequences you have to visit each one to change this setting, and you have to remember to move it on newly-created Task Sequences1. And while it’s less than ideal to couple in-sequence actions to settings you get from being domain joined, your deployments may rely on such settings. We take advantage of being domain-joined to register and license certain software based on registry information set from GPPs, and also on the domain’s settings for MS licensing and activation.
Luckily, there is a better way.
Our approach
Our method also works for any system where the “Default”/autologon entries in the registry are active for the local admin user, so it’s more general than just MDT, or could be easily adapted for a different autologon scenario that you might need to account for, or you could make it dynamic based on just about anything that ILT can target.
This approach could be broadened to other situations where you want more control of application over an ADMX’s setting, through ILT’s powerful capabilities; you could use GPP’s Registry items and item-level targeting features to edit the ADMX’s registry entries directly, instead of through the ADMX/GPO interface.
Quickstart
If you’d like to replicate our approach and are familiar with the issue and AD/GPOs/ILT/LAPS/MDT, you can follow these steps in a test environment or test OU/security-filtered group. If successful, you could implement it broadly by re-creating/re-linking the policies as needed.
We’ll have a detailed step-by-step guide below if you’d like more context, links to resources and some screenshots. If you’re new to LAPS or Group Policy Preference’s Item-level targeting feature, you may wish to follow the longer guide. You also reference the longer guide if you want more information about a paricular step mentioned here.
- Load the LAPS ADMX(es) into your AD if you haven’t already2.
- Build an installer for deploying LAPS to clients. You might do this in MDT, your configuration management system, or in a GPO for
Software Settings->Assigned Applications. It’s an MSI-based installer, so it is relatively simple to deploy silently. - Create a new GPO for your LAPS settings (password construction details, password age, etc), but do not define the
Enable local admin password managementsetting. - Create another new GPO for dynamic LAPS enablement and either copy/paste my Registry items XML output below, or make these settings yourself:
- Create a new Registry Item to Update
HKLM\SOFTWARE\Policies\Microsoft Services\AdmPwd\AdmPwdEnabledto aREG_DWORDvalue of1.- In this registry item, visit the Common tab, click the checkbox to Enable
Item-level targetingand enter theTargeting...menu.- Create a new Registry Match ILT item:
Match type: Match value dataValue data match type: AnyHIVE: HKEY_LOCAL_MACHINEKey Path: SOFTWARE\Microsoft\Windows NT\CurrentVersion\WinlogonValue name: AutoAdminLogonValue type: AnyValue data: 1
- Right-click the ILT item you just created and choose
Item Options->Is not. - Create a second Registry Match ILT item, ensure it has an AND relationship with your first one, with these settings:
Match type: Match value dataValue data match type: AnyHIVE: HKEY_LOCAL_MACHINEKey Path: SOFTWARE\Microsoft\Windows NT\CurrentVersion\WinlogonValue name: DefaultUserNameValue type: AnyValue data: the username of the local administrator account that MDT uses. In our case, this is the default, Administrator .
- Right-click the item you just created and choose
Item Options->Is not.
- Create a new Registry Match ILT item:
- In this registry item, visit the Common tab, click the checkbox to Enable
- Create another new Registry Item to Update
HKLM\SOFTWARE\Policies\Microsoft Services\AdmPwd\AdmPwdEnabledto aREG_DWORDvalue of0.- This one should have a higher
Ordernumber than the previously-created item. - In this registry item, again go to the Common tab, enable Item-level targeting, and in the targeting menu:
- Create a new Registry Match ILT item:
Match type: Match value dataValue data match type: AnyHIVE: HKEY_LOCAL_MACHINEKey Path: SOFTWARE\Microsoft\Windows NT\CurrentVersion\WinlogonValue name: AutoAdminLogonValue type: AnyValue data: 1
- Create a second Registry Match ILT item, ensure it has an AND relationship with your first one, with these settings:
Match type: Match value dataValue data match type: AnyHIVE: HKEY_LOCAL_MACHINEKey Path: SOFTWARE\Microsoft\Windows NT\CurrentVersion\WinlogonValue name: DefaultUserNameValue type: AnyValue data: the username of the local administrator account that MDT uses. In our case, this is the default, Administrator .
- Create a new Registry Match ILT item:
- This one should have a higher
- 04/19/23 update for Windows LAPS: Create a new Registry Item to Delete registry value
BackupDirectoryinHKLM\Software\Microsoft\Windows\CurrentVersion\LAPS\Config.- In this registry item, visit the Common tab, click the checkbox to Enable
Item-level targetingand enter theTargeting...menu.- Create a new Registry Match ILT item:
Match type: Match value dataValue data match type: AnyHIVE: HKEY_LOCAL_MACHINEKey Path: SOFTWARE\Microsoft\Windows NT\CurrentVersion\WinlogonValue name: AutoAdminLogonValue type: AnyValue data: 1
- Right-click the ILT item you just created and choose
Item Options->Is not. - Create a second Registry Match ILT item, ensure it has an AND relationship with your first one, with these settings:
Match type: Match value dataValue data match type: AnyHIVE: HKEY_LOCAL_MACHINEKey Path: SOFTWARE\Microsoft\Windows NT\CurrentVersion\WinlogonValue name: DefaultUserNameValue type: AnyValue data: the username of the local administrator account that MDT uses. In our case, this is the default, Administrator .
- Right-click the item you just created and choose
Item Options->Is not.
- Create a new Registry Match ILT item:
- In this registry item, visit the Common tab, click the checkbox to Enable
- 04/19/23 update for Windows LAPS: Create another new Registry Item to Update registry value
BackupDirectoryinHKLM\Software\Microsoft\Windows\CurrentVersion\LAPS\Configto aREG_DWORDvalue of0.- This one should have a higher
Ordernumber than the previously-created item. - In this registry item, again go to the Common tab, enable Item-level targeting, and in the targeting menu:
- Create a new Registry Match ILT item:
Match type: Match value dataValue data match type: AnyHIVE: HKEY_LOCAL_MACHINEKey Path: SOFTWARE\Microsoft\Windows NT\CurrentVersion\WinlogonValue name: AutoAdminLogonValue type: AnyValue data: 1
- Create a second Registry Match ILT item, ensure it has an AND relationship with your first one, with these settings:
Match type: Match value dataValue data match type: AnyHIVE: HKEY_LOCAL_MACHINEKey Path: SOFTWARE\Microsoft\Windows NT\CurrentVersion\WinlogonValue name: DefaultUserNameValue type: AnyValue data: the username of the local administrator account that MDT uses. In our case, this is the default, Administrator .
- Create a new Registry Match ILT item:
- This one should have a higher
- Create a new Registry Item to Update
- Recommended: Order your GPOs so the LAPS settings GPO is applied before the second GPO dynamic LAPS enablement.3 That is, the first GPO made should have a higher precedence number than the second in the
Group Policy Inheritancetab. - Test! Check out your in-band/previously built clients to ensure that LAPS is applying to them, with
regeditand/or theLAPS UIapplication. Then try to test out an MDT build and ensure a domain-joined machine is does not have LAPS enabled during MDT’s build process. You can retry problematic deployments and see if they work, or use MDT’s suspend/resume pattern in a Task Sequence to help you accomplish this, verifying again withregeditor theLAPS UIapplication. You can further verify that a particular computer “flips” to enabled LAPS after it finishes its MDT build successfully.
Full step-by-step guide
We’ll expound on some of our decisions in this guide. And this guide might be userful for you if you’re new to LAPS, Group Policy Preferences or the Item-level targeting features. You may also be interested in some of our footnotes.
Load the LAPS ADMX(es) into your AD if you haven’t already.
Like many pieces of software intended to work with Active Directory, or be managed in an enterprise Windows-based environment, LAPS includes its own Group Policy administrative templates, often refered to by their file extensions of “ADMX” or “ADM”. These files can be imported into your domain controllers and will provide ways to manipulate settings through Group Policy settings, in the Administrative Templates area of User and Computer Group Policy Objects. Many third-party software vendors provide adminstrative templates as a convenience. ADMXs ultimately define registry settings, and that’s what our method takes advantage of. An excellent resource for discovering which registry settings a given ADMX setting modifies is admx.help. You can browse their page on the LAPS settings if you’d like to dive deeper into where they get applied to a system.
LAPS’ .admx files get loaded into your domain the same way that others do. If you’re unfamiliar, or you’d just like to see LAPS-specific ADMX loading information, see these links:
- Wendy Jiang’s reply to GPO ADMX files for LAPS on TechNet
- The beginning section on thesysadmins.co.uk’s blog on installing LAPS (Part 2)
There are other steps necessary to fully prepare your Active Directory environment for LAPS if it hasn’t been already. For more information, see the footnote2.
Build an installer for deploying LAPS to clients
I am making the assumption that if you’re interested in our guide that you probably already a preferred method for deploying software to computers under your management. And if so, you don’t need to know much about deploying the LAPS client onto your endpoints other than it includes an .MSI installer files for 64-bit and 32-bit machines and they can be configured to install silently as expected. You could easily create a silent installer to be deployed by MDT if you like.
You can deploy the LAPS client to your endpoints and it will remain dormant until you define LAPS policies in later steps, and you’ll definitely need it to be able to use LAPS, so you’ll want to get that squared away now.
If you don’t have a go-to method for deploying LAPS, or would like it perhaps more tied to your Active Directory than other installations (this may be appropriate since LAPS relies on Active Directory), you can build a GPO that installs it for you. You will need to host the .MSI installer files4 on a share that your computers can reach and read, and you can follow Prajwal Desai’s excellent instructions on how to Create a GPO to deploy LAPS.
Create a new Group Policy Object (GPO) for your LAPS settings
Our method will have us making two GPOs where someone would ordinarily create one; one policy to manage the settings for LAPS, and a later policy dynamically disable LAPS while MDT is building, and enable it otherwise.
You’ll need to decide what LAPS settings make sense for your situation, but here’s an example of ours:

-
If you’re using LAPS in earnest, you certainly want to Enable the
Do not allow password expiration time longer than required by policypolicy. This ensures that an outside influence cannot extend the LAPS password deadline to circumvent the control. -
You will also want a short expiration time, defined in
Password Age (Days). I think that setting it to the minimum, 1 day, makes most sense5.
-
Your organization may have guidance or requirements you need to follow in the
Password Complexitysettings. -
If your environment uses a different account for local administrator, you can define it in
Name of administrator account to manage. But if you use the default account Administrator, then don’t define that setting and LAPS will handle it for you.
Enable local admin password management setting in this policy; we’ll do it in another one.Create another GPO, for dynamic LAPS enablement
Finally, it’s time for the interesting part. Remember that our overall goal is to disallow LAPS to take effect while a computer is being built by MDT, and to enable it otherwise. We’re going to manage this with information on the state of the computer from the registry, taking advantage of the Item-level Targeting feature of Group Policy Preferences, and apply LAPS enable/disable setting directly in the registry instead of through the ADMX.6
To do this, we need to gather some information.
First, you need to know the username of the account that MDT uses for local admin during deployments. The overwhelming majority of the time, this is the default, built-in Administrator account, but if you’ve changed it somehow, you’d need to know its username. But I’ll be writing the rest of the guidance assuming it is Administrator.
Second, we need to know the actual registry setting that the LAPS Administrative Template setting modifies to enable or disable LAPS. Luckily, the fantastic admx.help has a page that can tell us what it is.
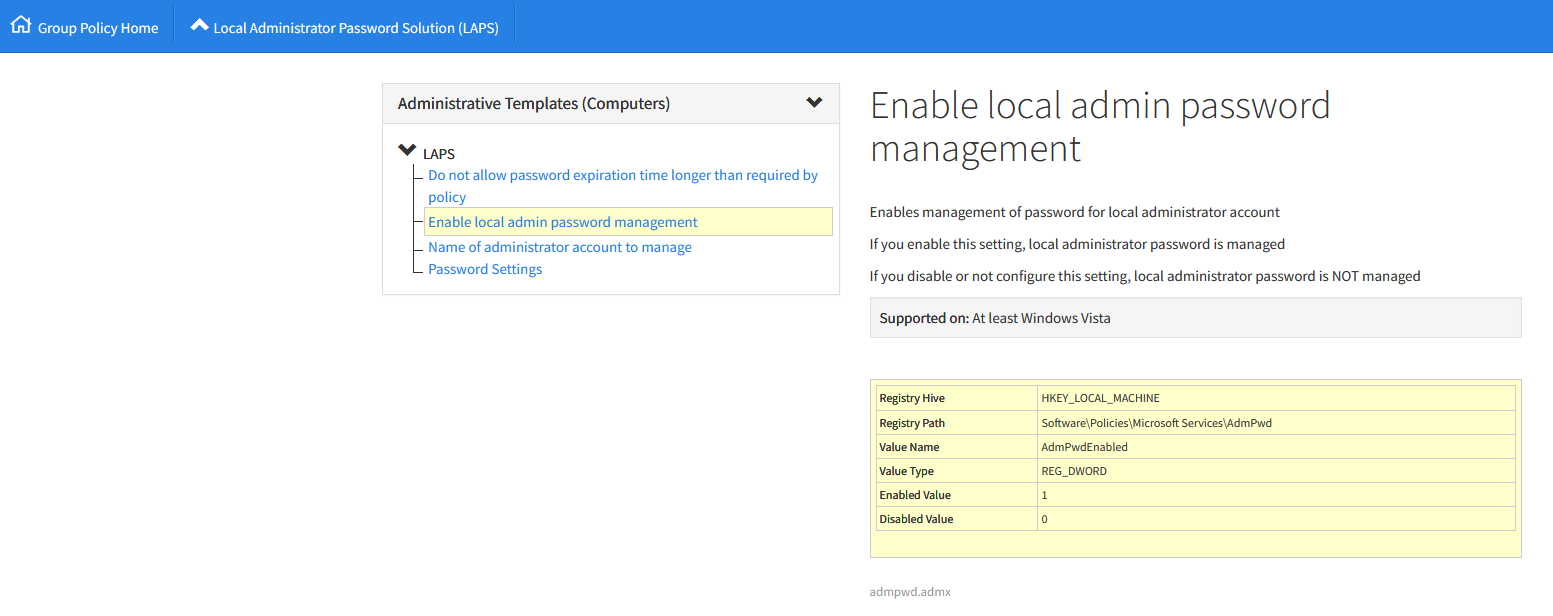
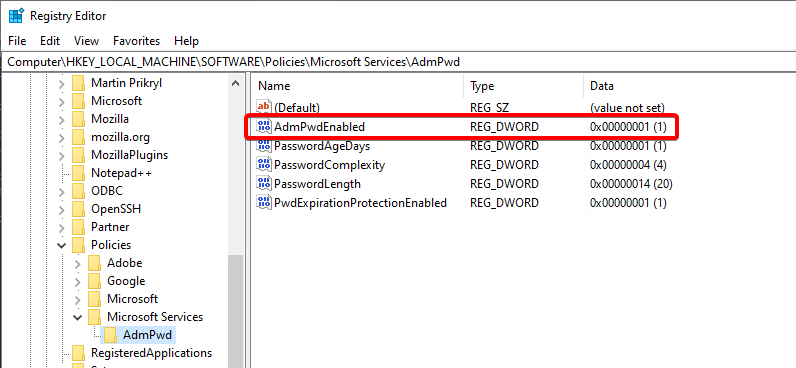
The registry setting to enable or disable LAPS is a DWORD value of AdmPwdEnabled at HKEY_LOCAL_MACHINE\Software\Policies\Microsoft Services\AdmPwd, Data being a 1 for enabled or 0 for disabled.
We should have what we need now.
You want to create a new GPO for dynamic LAPS enablement. Just as before, you should be doing this initially in a test area of some kind.
In the GPMC editor’s windows of our policy, expand the left-hand page to Computer Configuration -> Preferences -> Windows Settings -> Registry. Right-click on Registry and click on New -> Registry Item. Fill out the New Registry Properties as follows:
- Action:
Update - Hive:
HKEY_LOCAL_MACHINE - Key path: SOFTWARE\Policies\Microsoft Services\AdmPwd
- Value name: AdmPwdEnabled (don’t click on the “Default” checkbox)
- Value type:
REG_DWORD - Value data: 1 (hex or decimal doesn’t matter for this value)
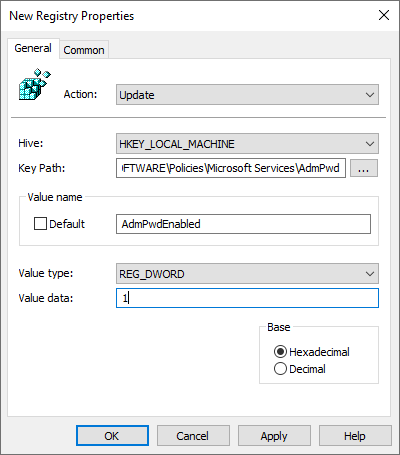
This creates the registry settings necessary to enable LAPS.
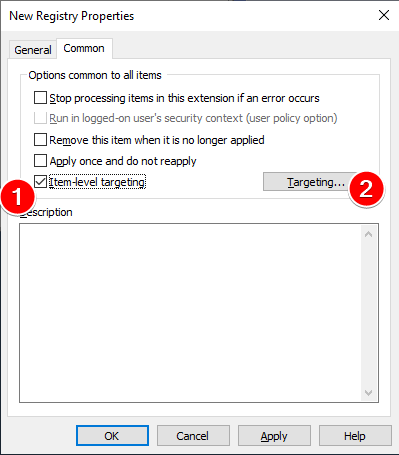
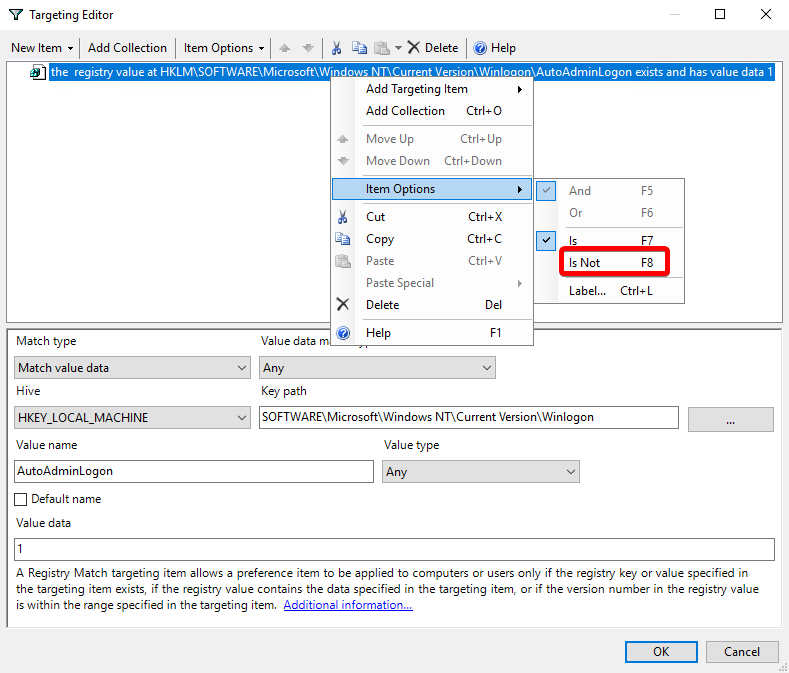
Click on the Common tab to get to special GPP settings. Click the checkbox to enable Item-level targeting then click the Targeting... button to enter that menu.
In the ILT Targeting Editor menu, click on New Item then Registry Match to create a registry match targeting item.
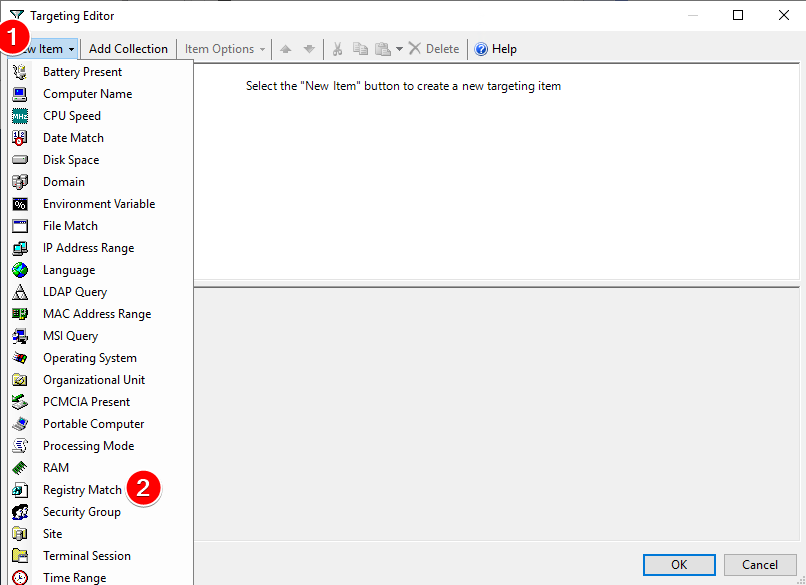
Then configure your newly-created item as follows:
Match type: Match value dataValue data match type: AnyHIVE: HKEY_LOCAL_MACHINEKey Path: SOFTWARE\Microsoft\Windows NT\CurrentVersion\WinlogonValue name: AutoAdminLogonValue type: AnyValue data: 1

What you’ve just done is create a check that will require the autologon setting HKLM\SOFTWARE\Microsoft\Windows NT\Current Version\Winlogon\AutoAdminLogon to be 1 for your policy to apply. But this is the opposite of what we want. Right-click your recently created item and choose Item Options -> Is not to reverse the sense of the check.
After you change to the Is Not sense, you also get some bonus logic like the registry value not existing in the first place, in addition to the values not matching.
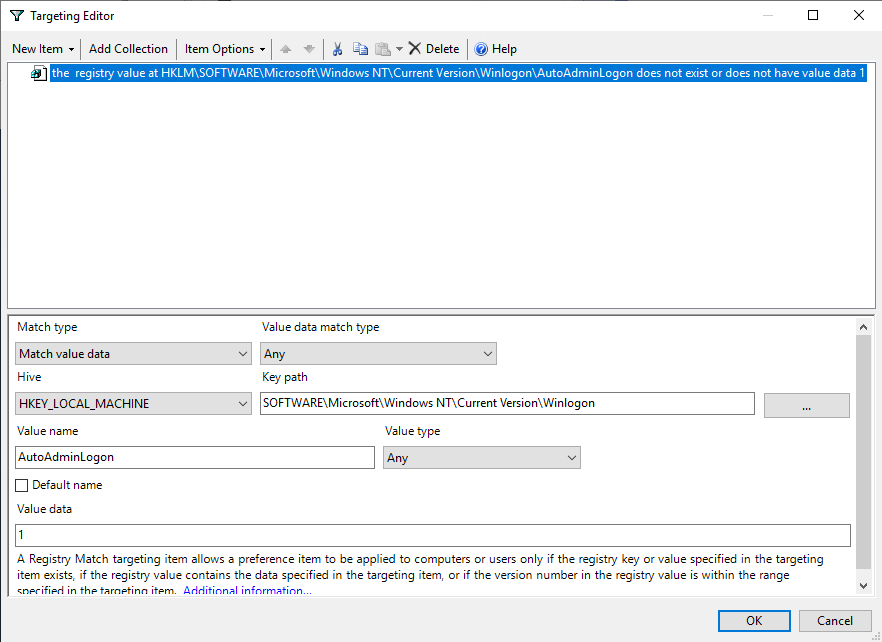
We want to create a second check, to verify that the autologon process is using the username of the MDT user.
Click on New Item -> Registry Match and fill it out thusly:
Match type: Match value dataValue data match type: AnyHIVE: HKEY_LOCAL_MACHINEKey Path: SOFTWARE\Microsoft\Windows NT\CurrentVersion\WinlogonValue name: DefaultUserNameValue type: AnyValue data: username of the local administrator account that MDT uses. It’s probably Administrator
Then right-click the item you just created and again choose Item Options -> Is Not and ensure that Item Option -> And is selected.
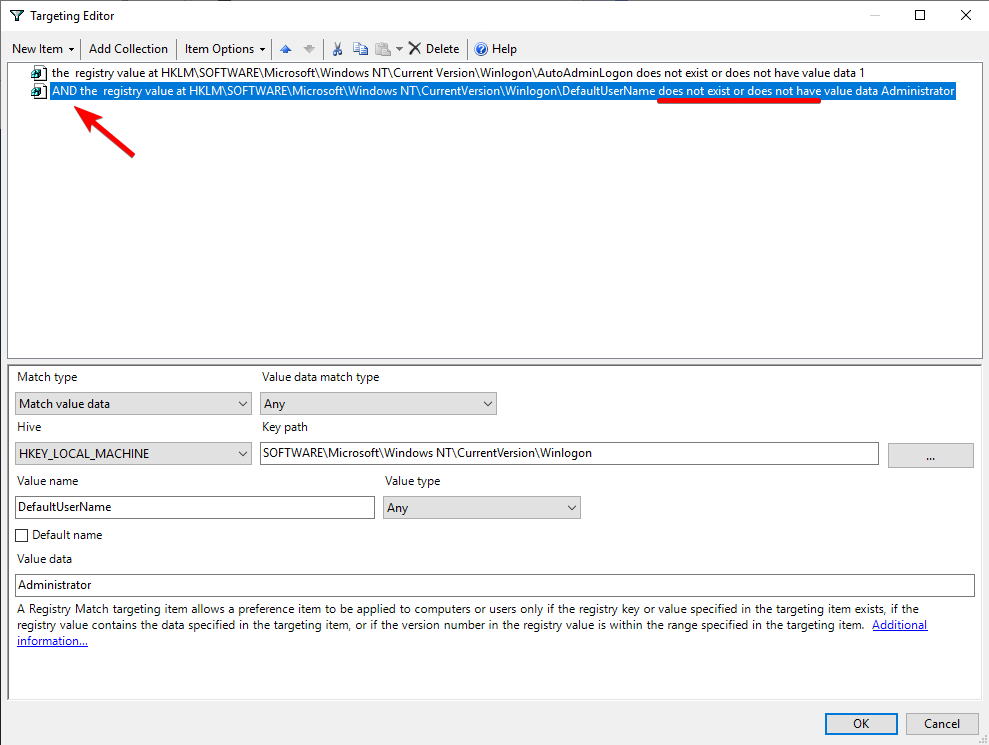
Click OK on the two windows to complete the configuration.
You’ve now configured the base case/default policy, to enable LAPS if MDT (or some other software, potentially) is not configured to automatically log in to the computer with the Administrator user.
We’ll now create a second registry item to do the opposite: disable LAPS if the Administrator account is configured to autologon.
Click on New -> Registry Item. Fill out the New Registry Properties as follows:
- Action:
Update - Hive:
HKEY_LOCAL_MACHINE - Key path: SOFTWARE\Policies\Microsoft Services\AdmPwd
- Value name: AdmPwdEnabled (don’t click on the “Default” checkbox)
- Value type:
REG_DWORD - Value data: 0 (hex or decimal doesn’t matter for this value)
Click on the Common tab, click the Item-level targeting checkbox, then enter the ILT menu by clicking the Targeting... box. In the Targeting Editor menu, click on New Item then Registry Match to create a registry match targeting item with the following settings:
Match type: Match value dataValue data match type: AnyHIVE: HKEY_LOCAL_MACHINEKey Path: SOFTWARE\Microsoft\Windows NT\CurrentVersion\WinlogonValue name: AutoAdminLogonValue type: AnyValue data: 1
And again click on New Item -> Registry Match to create another ILT item:
Match type: Match value dataValue data match type: AnyHIVE: HKEY_LOCAL_MACHINEKey Path: SOFTWARE\Microsoft\Windows NT\CurrentVersion\WinlogonValue name: DefaultUserNameValue type: AnyValue data: username of the local administrator account that MDT uses. It’s probably Administrator
Like the ILT checks for the previous registry item, these should be in an AND relationship with one another, which is the default, and this time, these should be remain configured as Is since we want LAPS to be disabled if they’re true. Click OK to close out of the ILT menu and new Registry item menu, saving your changes.
There is a configurable order to the processing of Group Policy Preferences and Item-level targeting items. With these, the lowest number applies first8. This is the order that we would want them in: the GPP item to enable LAPS goes first and would be overridden by item to disable it if that one matched instead. You shouldn’t need to change the order, since you created them in the order you’d want, but know that you can if you had to for other GPPs/ILTs that you write.
Feel free to compare your work to our screenshot of the second Registry item’s configuration and its ILT configuration:

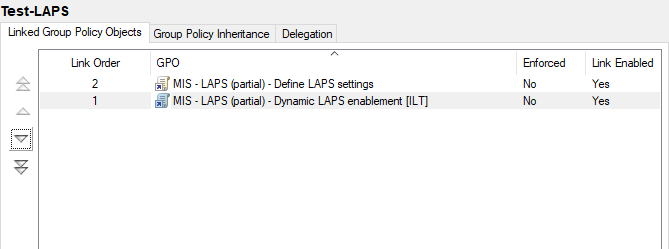
Order your GPOs
In the Group Policy Management console, the Linked Group Policy Objects tab will show the order in which Group Policy Objects are applied in a given OU. The group policy lingo, GPO order is called precedence.
While not completely necessary, I’d recommend setting your 2 created GPOs such that the LAPS settings GPO applies first, and the dynamic enablement GPO applies after. I think this is a good idea because it should protect you someone else were to unwittingly enable/disable LAPS in the settings GPO; the dynamic enablement should apply after and “fix” things3.
With GPO precedence, the lowest number is applied last.
And you’re pretty much done!
Test and check
With your settings in place, you can now check your clients.
On a client where you’d expect LAPS to be enabled, that is, a client that’s not being actively built by MDT:
- Log into the test machine with an administrative account.
- Run
gupdate /forceto kick off an immediate group policy update process. This will lay down your LAPS settings, do the dynamic enablement, and if you’re installing the LAPS client software via GPO, it will do that as well. - Run
regeditand navigate toHKEY_LOCAL_MACHINE\SOFTWARE\Policies\Microsoft Services\AdmPwd.- Check on the
AdmPwdEnabledsetting. It should be1to show LAPS is enabled. - And you should see the other LAPS settings be applied as well, from the GPO using LAPS’ ADMX.
- Check on the
- Run
gpupdate /forceagain. With the LAPS settings in place, the LAPS client should be managing the password on this run. You can now use LAPS’ tools to view the password and expiration date:- From an administrative console where you installed LAPS, you can use the
LAPS UIapplication to see the LAPS password and its expiration date. Note: If the previously set local admin password is younger than thePassword Age (days)setting you use, LAPS won’t reset it until it ages out - Or, you can also use PowerShell to query a computer object’s LAPS password and expiration time. Assuming the account you’re using has permissions to read the attributes9, and you have the
ActiveDirectoryPowerShell module installed, the commandGet-ADComputer -Properties ms-MCS-AdmPwdExpirationTime,ms-MCS-AdmPwd -Identity <computername>should do the trick.- To convert the
ms-MCS-AdmPwdExpirationTimeattribute to something more human-readable, you can set it to a variable$varand run[datetime]::FromFileTime([convert]::ToInt64($var,10)).DateTime
- To convert the
- From an administrative console where you installed LAPS, you can use the
If that’s all working, then your post-MDT/non-MDT clients should be good to go.
In terms of testing that this solved the original issue during MDT build scenarios, the simplest way to verify its effectiveness may be to just try some builds, particularly ones that were failing due to this issue, and see if they now work.
But the most complete way would be to edit one of your Task Sequences to include a Suspend/Resume workflow. You can use suspend/resume to effectively pause a deployment to examine or fix something manually, then click the Resume Task Sequence icon on the desktop to continue the deployment. We make use of mulitple suspend/resume tasks on our thick image preparation sequences, and use the suspend/resume pattern while developing and troubleshooting complex sequences. It’s a great, underutilized MDT feature! Todd Lathome’s blog has good instructions on how to create one and an example of ours looks like this:
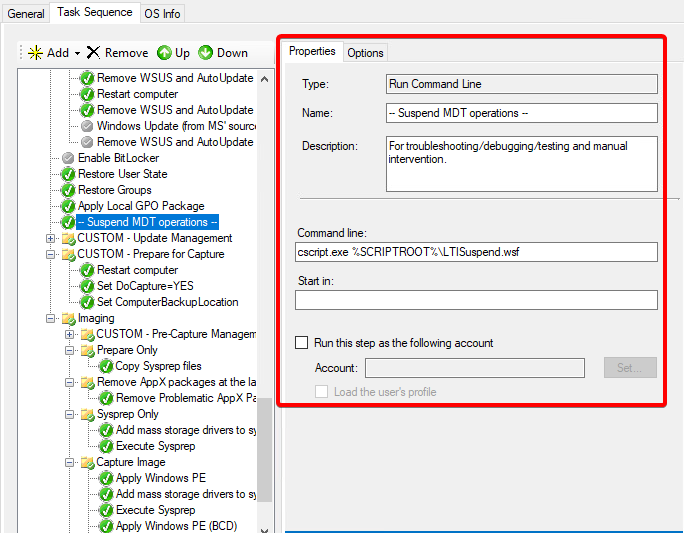
For testing this situation, you’d put your suspend/resume near the end of a Task Sequence, long after it should have joined the domain, and if you’ve performed reboots or done gpupdates as part of your build, all the better. Then kick off a build/rebuild of a test system with that sequence.
When the build reaches the suspend, open up regedit, navigate to HKEY_LOCAL_MACHINE\SOFTWARE\Policies\Microsoft Services\AdmPwd, and ensure the AdmPwdEnabled value is 0, indicating that LAPS is disabled.
You can then click on the Resume Task Sequence desktop icon to resume the build, let it complete successfully, then try the checks above again to ensure that LAPS has become enabled.
If that’s all working, you should be done! Enjoy your builds working with the originally set password all the way through, and the rest having LAPS configured.
XML export of my dynamic LAPS enablement registry items
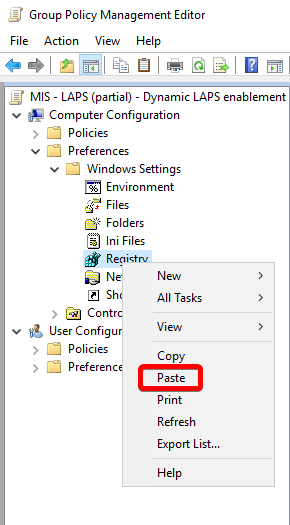
If you’d like to try pasting my configuration of the above 2 registry settings for dynamic LAPS enablement, complete with ILT configuration, my output is here:
You’d copy this XML, then right-click on your GPO’s Computer Configuration -> Preferences -> Windows Settings -> Registry option in the left-hand pane of the Group Policy Management Editor, then click Paste7.
Update 4/19/23 - Updating our approach for Windows LAPS
Microsoft released a new version of LAPS, called “Windows LAPS”, on April 11th, 2023. It was included in patches released for Windows 10, Windows 11, and Windows Server 2019 and 202210, so if you installed those updates, you now have Windows LAPS.
Luckily, the new Windows LAPS can manage clients running the older LAPS CSE in what they call Legacy Mode, so you can ease into Windows LAPS over time. Unfortunately, there is additional work to do in scenarios like the one we’re try to solve here, preventing LAPS from applying during system deployment. But, fortunately, there’s now guidance from Microsoft on how to handle that, and we can integrate those changes into our existing GPP.11
Essentially, just as we disabled the old LAPS from applying in autologon situations, we now need to prevent the new Windows LAPS from applying in autologon situations as well. This can be done by defining a new registry value named BackupDirectory in HKLM\Software\Microsoft\Windows\CurrentVersion\LAPS\Config to have a REG_DWORD value of 0, and triggering it to apply when autologon is active. We also need to delete this registry value when LAPS should apply, or better yet, set it to a sane value so the password gets backed up.12
I’ve already updated our gist that contains our GPP Registry values, you could copy and paste this into your own GPO if you like. If you’d prefer to write them yourself, please add these two new GPP Registry items:
- Create a new Registry Item to Update registry value
BackupDirectoryinHKLM\Software\Microsoft\Windows\CurrentVersion\LAPS\ConfigtoREG_DWORDvalue of2, meaning Active Directory backup of the password. If you’d prefer to backup to Microsoft Entra instead, use a value of1.12- In this registry item, visit the Common tab, click the checkbox to Enable
Item-level targetingand enter theTargeting...menu.- Create a new Registry Match ILT item:
Match type: Match value dataValue data match type: AnyHIVE: HKEY_LOCAL_MACHINEKey Path: SOFTWARE\Microsoft\Windows NT\CurrentVersion\WinlogonValue name: AutoAdminLogonValue type: AnyValue data: 1
- Right-click the ILT item you just created and choose
Item Options->Is not. - Create a second Registry Match ILT item, ensure it has an AND relationship with your first one, with these settings:
Match type: Match value dataValue data match type: AnyHIVE: HKEY_LOCAL_MACHINEKey Path: SOFTWARE\Microsoft\Windows NT\CurrentVersion\WinlogonValue name: DefaultUserNameValue type: AnyValue data: the username of the local administrator account that MDT uses. In our case, this is the default, Administrator .
- Right-click the item you just created and choose
Item Options->Is not.
- Create a new Registry Match ILT item:
- In this registry item, visit the Common tab, click the checkbox to Enable
- Create another new Registry Item to Update registry value
BackupDirectoryinHKLM\Software\Microsoft\Windows\CurrentVersion\LAPS\Configto aREG_DWORDvalue of0.- This one should have a higher
Ordernumber than the previously-created item. - In this registry item, again go to the Common tab, enable Item-level targeting, and in the targeting menu:
- Create a new Registry Match ILT item:
Match type: Match value dataValue data match type: AnyHIVE: HKEY_LOCAL_MACHINEKey Path: SOFTWARE\Microsoft\Windows NT\CurrentVersion\WinlogonValue name: AutoAdminLogonValue type: AnyValue data: 1
- Create a second Registry Match ILT item, ensure it has an AND relationship with your first one, with these settings:
Match type: Match value dataValue data match type: AnyHIVE: HKEY_LOCAL_MACHINEKey Path: SOFTWARE\Microsoft\Windows NT\CurrentVersion\WinlogonValue name: DefaultUserNameValue type: AnyValue data: the username of the local administrator account that MDT uses. In our case, this is the default, Administrator .
- Create a new Registry Match ILT item:
- This one should have a higher
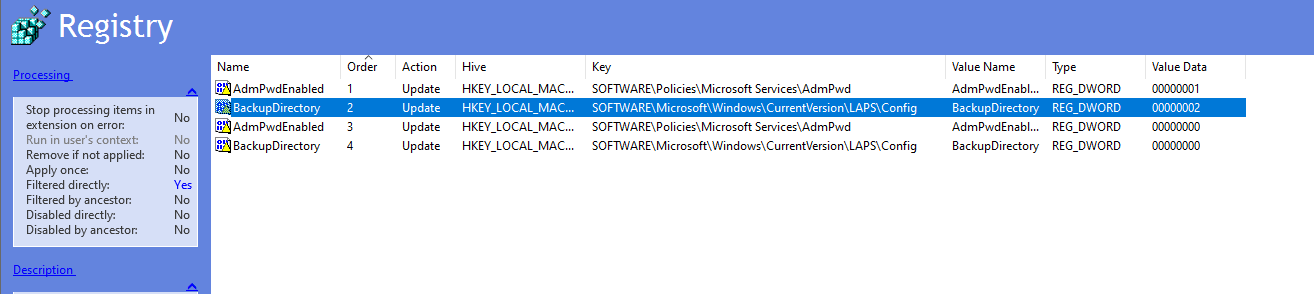 Screenshot of our new GPP settings and their order
It’s possible we’ll write a new version of this page that ignores the old/legacy LAPS and solely targets the new Windows LAPS, but for now you might have to worry about both the old and new LAPS in the same environment just as we do, and this new guidance will work for you with both.
Footnotes
-
You can mitigate this somewhat by creating and using Task Sequence Templates in MDT, where the
Recover From Domaintask is in the correct place. But, of course, you’d have to recreate or alter your existing templates to move them, along with any pre-existing task sequence. But I highly recommend using templates in general so you can reuse complex MDT tasks and task folders across deployment scenarios. ↩ -
There may be other steps necessary to prepare your Active Directory for LAPS if it hasn’t been already, including extending the schema for new LAPS-related computer object attributes and configuring permissions for computers and users to interact with the new LAPS-related attributes, defining who can read the LAPS password itself. This is a bit outside of the scope of the article, and covered in many other guides, and is explained quite succinctly in this Now Micro blog post. You will have to make your own decisions on which users should be able to read LAPS passwords, and at what level such privileges that should be delegated. ↩ ↩2
-
This isn’t technically necessary with the design we have, but will be helpful later if someone alters your LAPS GPO and unwittingly enables it across the board. The hide you save may be your own! Precedence is the order that the GPOs apply in. In the
Linked Group Policy ObjectsandGroup Policy Inheritancecolumns, the smallest number is applied last8. Being mindful and intentional with GPO precedence (and inherited precedence) is a good practice anyway, as the order of GPO/GPP application can overwrite a previous setting, and sometimes this is exactly what you want to accomplish something interesting. Manipulating precedence is how theEnforcesetting works on GPOs as well. ↩ ↩2 -
You may only need to support the 64-bit installation method if you don’t have any 32-bit clients anymore. ↩
-
Because LAPS password changes are managed by the Group Policy refresh/update (ie,
gpupdate) process, you can expect a bit of drift from your intended password age. The background refresh of Group Policy occurs every 90 minutes by default, and may tack on another 0-30 minutes at random on top of that. On each run, group policy update will patrol for an expired LAPS password, changing it if its expired. So the effective age is more like yourPassword Age (Days)value plus some number of minutes up to 120. ↩ -
Some of us more seasoned types can still recall that before it was Group Policy Preferences, it was PolicyMaker from Desktop Standard. It struck me while writing this article that it’s been over 15 years since Microsoft acquired Desktop Standard and PolicyMaker’s functionality is still relegated to a separate top-level folder in the GPMC editor window, and not integrated more broadly. But I should probably just be happy that it’s there at all as it continues to be a powerful tool that we rely on for all sorts of advanced configuration that would otherwise be hidden away in scripts and configuration management platforms. ↩
-
Group Policy Preferences supports XML-based copy/paste of most or all of its configuration items, and also of its Item-level targeting targets as well. I suggest you use this feature as much as possible, especially if you developing big policies with minor changes between each item, or you want to apply ILTs across several policies easily. It can really cut down on errors and tedium. It also generally supports right-click enabling or disabling of individual configuration items, which can help you out during testing and troubleshooting, and isn’t as heavy-handed as having to enable or disable the entire policy. ↩ ↩2
-
Yes, it’s annoying and confusing that meaning of the numbers in GPO precedence and GPP order are reversed from one another! ↩ ↩2
-
Some “in the weeds” notes regarding LAPS attribute permissions: It’s considered best practice to have the list users who can read LAPS passwords be a small one, and have additional requirements around when or from where they can read them. But the computer object also needs the ability to write new passwords and read+write password expiration into its computer object attributes. The computer will use the
NT AUTHORITY\SYSTEMuser to do this, and sometimes that can be another way to learn of a LAPS password’s expiration datetime. The old-school way to run something as SYSTEM was to wrap what you wanted to do in a Scheduled Task set to run as that user, but you can also usepsexec -sor theInvoke-CommandAsPowerShell module as a bit of a shortcut. ↩ -
Windows LAPS was does not work on Windows Server 2016, so if you’re still using Windows Server 2016 and wish to manage LAPS on it, you’ll still use the old method with the LAPS CSE and the old LAPS GPO settings. If you’re moving forward with Windows LAPS in your environment, you may wish to write a WMI filter to target your Windows Server 2016 member servers, and then restrict those old LAPS GPOs to those 2016 Server systems via your WMI filter, to manage both old and new LAPS in your environment. ↩
-
It’s not all good news, though. Microsoft announced a regression that occurs when the old LAPS client-side extension (CSE) gets installed after the April 11th updates, which breaks both the old LAPS and the new Windows LAPS. Thankfully, the resolutions are pretty straightforward, and hopefully they can find a way to fix the issue without needing intervention. ↩
-
This improvement over our original guidance, which was to delete the
BackupDirectoryvalue, is thanks to Jan Inge. Thanks for the suggestion, Jan! ↩ ↩2